|
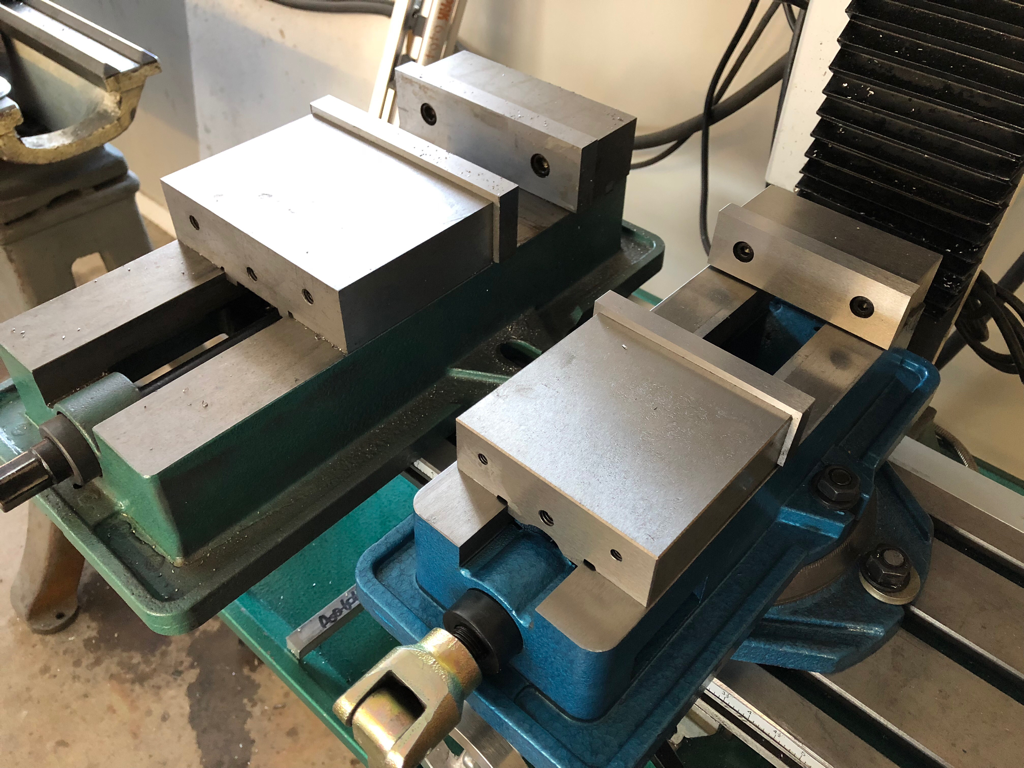
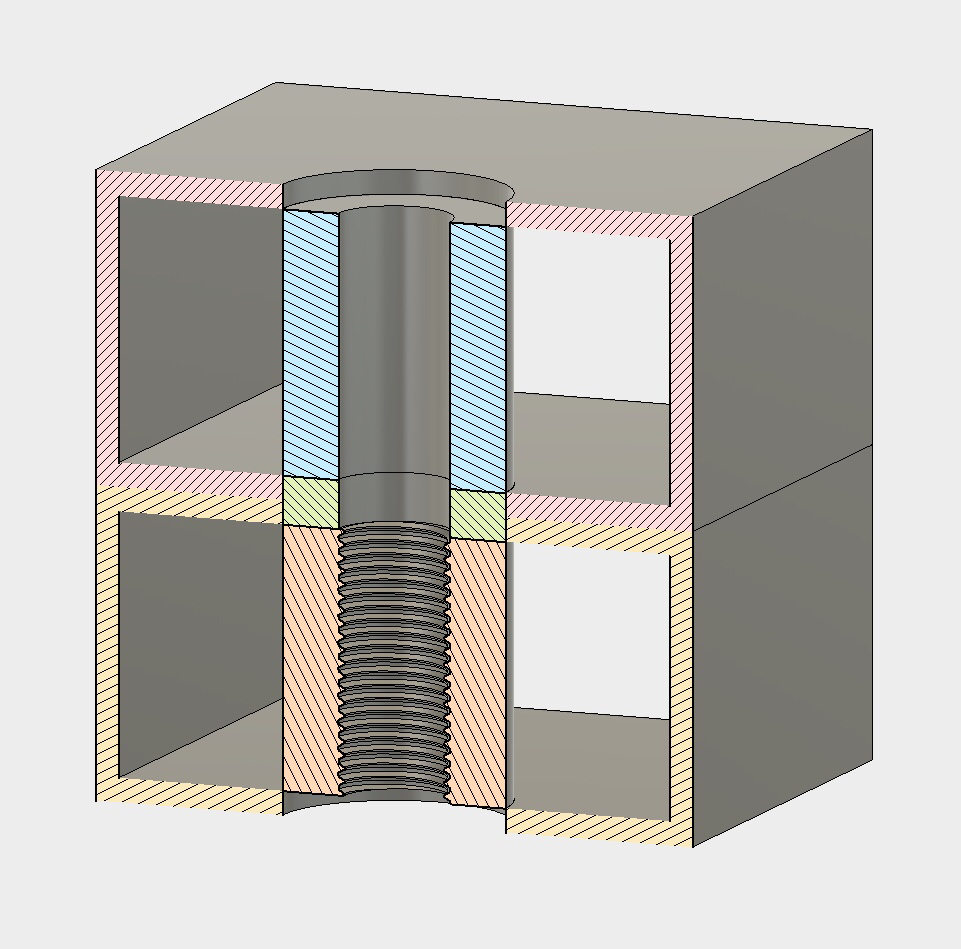
starting in early December I decided it to cross off one of my major purchase goals, a dirtbike for my daughter. Every once in a while I take her down to our local motorcycle shop to purchase parts for my dirtbike, and every time she loves to go climb all over the little motorcycles and four wheelers there, to the point that is a real chore to get her off of them and go home. She has also been asking when she can get one. I decided that this little Yamaha PW50, along with some riding gear, would be one of her christmas gifs this year. On the plus side, after getting her comfortable with the controls I think she will make a good little riding buddy. My house is situated about a block below an entrance to a small network of trails and off road play areas which I think will be a big part of my daughters life as she grows, and this will only help... and i think she will be able fit this bike until she is 7ish... The bike was bought used, its a 2003, and the price was right($550) because it needed some help before christmas, which took up a good chunk of my time in the garage. Among the list of things that needed help were: - carburetor tune. I ended up buying a new carb for it and an asortment of jets since a brand new carb was $17.00 vs a rebuild kit for $30... go figure. - replace the steering stem bearings and races. The bottom bearing race was cracked so it had to go... - buy and install steering wheels - fix a bend exhaust collector that was making it leak - buy a new exhaust gasket that had the exhaust restriction plate. The restriction plate was missing on it when purchased, and it very much needed for new riders. - buy a new throttle limiting screw. This was also missing when purchased and is the second of two governors (other is the exhaust restrictor). - buy a new air filter housing as the existing one was cracked. - an extreme degreasing was also needed and some repainting of the frame. - clean out of the exhaust system to remove old carbon buildup since its a two stroke. - repaint the exhaust with high temp paint All of those were installed over a Saturday in the garage, and then run over to my brothers house so the cousins could be my test pilots before giving it to my daughter on christmas. My niece who is 5 did great on it and fit it really well. And my nephew who is 8 was a tad big, but dug how fast it was without the restrictor plate... during the test rides I noticed that it was spitting a ton of oil out the exhaust, which isn’t all that odd for a two stroke, but this seemed a little excessive. After doing some research I determined that the oil pump that pumps the oil and mixes it with gas in the carb was either adjusted wrong, or was just that way even adjusted correctly. The solution was to get rid fo the oil pump all together, install a block off plate where the pump went and just use pre mixed gas like my bike does. I am happy to report that my daughter loved the bike christmas morning, and we were able to go for a first ride the next day in a parking lot... she loves the gas and doesn’t want to let off and can even grab the break and stop the bike... though she doesn’ like too. It is also worth noting that even with the governors installed I had tuned the bike for too much power, and I richened up the jetting a bit to give a little less power for now. The other christmas gift that took a ton of time this month was a present for my Dad. He, like me pretty much has every tool you can think of, with the exception of parallel clamps. I decided I would make him a set and make it extra special by making a wooden box to keep them in. The Parrallel clamps are based on the first set I designed for me, but with a couple of changes, namely in the bracket that holds in one of the screws. Basically just a cleaner setup using a tapered Allen screw. I also tried applying gun blue, which worked, but it wasn’t the greatest job. For the box I used some poppler wood with a cocoa stain, brass hinges, and magnets for the catch. The box overall was kind of an experiment because I have literally only made one other wood box in my life. Honestly this one turned out better than I expected. And my dad has been keeping it on the kitchen table because he says they are too nice to keep in the garage for now. One other impovement I wanted to make on the clamps for my dad was to ensure that the threads in the holes were exactly perpendicular to the clamp itself. I decided to try using the mill to power tap the holes. For this I put the machine in low gear, turned the spindle speed all the way down to its lowest at 50 rpm’s, and then released the quill lock so once engaged in the hole it would pull it in under its own power. Once it was cut to depth I would hit the stop switch, and flip it to reverse and turn on the power and let it feed itself out. My first attempt was made with a standard high speed steel plug tap, which worked for one hole, but broke on the second one. I suspect that it broke because a standard tap, as understand it, is designed to be backed out a bit every couple fo turns to break the chip... and mine probably bound up which caused it to break. The solution was to buy a nice spiral fluted tap, which happed to be carbide with a special coating. This was sourced from my loacal cutting tool supplier for $19. The difference in the stress the tool was under and the stress the machine was under was incredible. The new spiral fluted tap cut like butter as you can see from the video above. I’m defiantly going to have to work on getting a whole set of these. Christmas was enjoyable as always, and as usually my family came through on some of my wish list items, namely a new smaller vice for the Grizzly mill. The green one on the left was what came with it, and the blue one was my christmas gift from my parents via my amazon wish list. It, like the other is a Chinese one, but will work great for what I do. The jaws open up a little over 5 inches and have a width of just under 4 inches. The big plus to this new vise is that it will allow for more y axis travel and when clamped to the angle indicator as shows it is just as tall as the old vise was without it. Which lends itself to more flexibility for setups without sacrificing any X-axis travel. I also snuck in some smaller projects needing to get done around the garage after christmas. The first was to pull apart a selfie stick and use the phone mount part in a new phone mount for my tripod so I can get some of the movies shots of the garage work a little easier. Prior to this I was using some small clamps to clamp my phone to the tripod. This is a much more user friendly holder, and I don’t worry about the clamp being to strong and cracking my screen. The second little project was to weld some angle iron on to the bottom of my welding table to support my nut and bolt cubby hole thing. I also cut a few more pieces to hold it side to side as well. Didn’t worry too much about quality on either of these little projects though I am sure they will hold up for a long time. On the 30th of Dec I was able to sneak out to the garage for one last Studebaker session in 2017. My goal was to finish welding the body mounts to the channels that I started in the last post. As I got set up to do that I realized that the mounts I had made wouldn’t work in some areas as they would interfere with the roll cage when it came time to lift the body of the chassis. The problem areas were mainly body mounts that are in the floor area. This made me want to go back to simply throwing a bolt through the two pieces of 2x1 rectangle tubing, but again over time the tubing would collapse around the bolted areas since they are hollow.... I decided that I would make a set of spaces to be welded into the tubing. The bottom one would be threaded, the top one smooth, and then once installed and welded all the way they would keep the tubing from collapsing int hose spots. The above picture shows the two spacers, with a temporary third in the middle to keep them positioned correctly while the top and bottom are welded. Then when the body is removed the final welding can occur in the area where the temporary spacer is. it took almost all my time that day in the garage to whip up 10 threaded spacers, 10 smoother bore spacers and 10 temp spacers. I started on the lathe with a piece of steel .75” solid cold roll round stock. From there I would drill in about 4 inches, tap those 4 inches for 3/8x24 thread, and then part off each section to .850 inches. Repeat, without the threading for the other spacers.
1 Comment
|
Download the
following Designs used in this build: Archives
February 2018
|


